It’s been over a year since I covered how to protect adminpanel routes in Laravel using Gates. Some people kept reminding me about my promise to cover ACL and user roles, and I kept putting off fulfilling that promise.
Finally I run into that on one of my projects, and that’s the sign I was waiting for to continue giving back to the community I learned so much from.
What is ACL

Although some computer science theorists enjoy using baffling definitions of the term (looking at you, MSDN), in reality it’s pretty simple and straightforward. ACL stands for Access Control List, and specifies what users are allowed to do.
There are three entities in the ACL:
- User Role: e.g. admin, editor, reader
- Object: e.g. blog post
- Operation: create, edit, read, etc.
For example, Jane Doe wants to edit a blog post. Is she allowed to do that? We’ll see.
- We find out Jane’s user group, and she turns out to be an editor.
- Then we check with the ACL if editors are allowed to edit posts. Yes, they may do that, so far so good.
- Jane has passed all our checkpoints and can edit the post now. Luckily, the process went quietly and she’ll never know that we just checked her identity as if she was boarding a plane, not adding a missing comma.
Sounds simple enough? Sure it is, let’s implement that
Initial Setup
I assume you already have a Laravel instance up and running. If not, I can only suggest following official documentation to set it up.
If you don’t yet have authentication setup, all you have to do is run following commands:
php artisan make:auth
php artisan migrate
These commands will create the authentication out of the box, create necessary controllers, models, views, routes, and everything else needed. For more details, read the Authentication Quickstart in Laravel Docs.
User Roles
You probably already know why you shouldn’t assign permissions to users directly, and use roles instead, so I won’t go into details. I’ll only say that even if you think you’ll only have a single user for a role, that might change in the future.
I’ve seen applications with hundreds of accounts with permissions assigned directly, without roles. Each time the management decides to add a permission to a set of users, somebody would go through each user and adjust that manually. It was painful to watch, and sooner or later they had to hire somebody to get rid of that overhead.
So, how do we create user roles? We need to do following:
- Come up with a list of properties we’ll need for our roles
- Create a database migration for user roles
- Create a migration to add the “role” column into the “users” table
- Create the database model for user roles
That might seem like a lot, but believe me, it’s all pretty easy to do. So, let’s begin!
User Role Attributes
We’ll keep it simple and use just a few basic attributes:
id (int)name (string)is_enabled (boolean)
Database Migration
Open the command line, go to the root project directory, and run following command:
php artisan make:migration create_roles_table
This creates the migration class located at:
database/migrations/[datetime]_create_roles_table.php
Let’s look what’s inside.
I won’t go into the details of creating a migration, as I already covered that in the article on protecting admin routes. Besides, you can always check the Laravel docs for more information.
We only need to add a few lines into the CreateRolesTable::up() method:
public function up()
{
    Schema::create('roles', function (Blueprint $table) {
        $table->increments('id');
        $table->string('name', 50); // the "name" attribute
        $table->boolean('is_enabled')->default(true); // the "is_enabled" attribute
        $table->timestamps();
    });
}
So, we created the database migration that creates our table, and this means we need to run it now
php artisan migrate
Pretty simple, isn’t it? Let’s see what have created
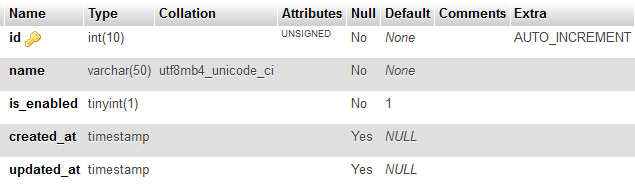
Looks great! Why don’t we add a couple of roles in there? You can use your favorite database client (who am I kidding, everybody uses phpMyAdmin these days).

That’s it. The migration is there, and now it’s time to tell Laravel how to communicate with it.
Database Model
As you probably know, to work with the database, Laravel provides a simple and powerful ORM called Eloquent. To perform any CRUD operations, we need to create a database model.
To do that, you need to run following command in the command line:
php artisan make:model Role
The command creates the model in the file app/Role.php, which inherits all the functionality we need from the Eloquent abstract model Illuminate\Database\Eloquent\Model.
However, we need to define the name of our database table. To do that, please add the following property into the Role model:
protected $table = 'roles';
That’s pretty much all we have to do to setup a database model. Quite easy, isn’t it?
Role Permissions
First, what is permission? We all know what it means in the real world, and here we won’t deviate from that too much. Instead, well clarify that it actually means.
Remember we talked about objects and operations in the beginning of the article? Permission is an entity stating that an editor is allowed to perform the operation edit over an object blog post. We are going to store all our permissions in the database, just as we store user roles.
Migration and Model
I won’t go into the details this time, as we already went through the same process with the user roles, so below is a brief description of what we need to do.
First, create the migration, add database columns, and run it:
php artisan make:migration create_role_permissions_table
public function up()
{
    Schema::create('role_permissions', function (Blueprint $table) {
        $table->increments('id');
        $table->integer('role_id', false, true);
        $table->string('object', 55);
        $table->string('operation', 55);
        $table->timestamps();
    });
}
php artisan migrate
Now let’s create the model:
php artisan make:model RolePermission
class RolePermission extends Model
{
    protected $table = 'role_permissions';
}
Database relationships
As you must’ve noticed, the role_permissions table is linked to roles using role_id. Although we know it, the application doesn’t, so let’s define the relations in the models.
First, let’s tell our roles that they have permissions assigned to them.
Add following method into the Role model:
public function permissions()
{
    return $this->hasMany(RolePermission::class, 'role_id', 'id');
}
Now you can load permissions for a particular model with a single line of code:
$roles = Role::find(2)->permissions;
To make the relation work in the opposite direction (find role a permission belongs to), let’s define it in the RolePermission model:
public function role()
{
    return $this->belongsTo(Role::class, 'role_id', 'id');
}
Here’s how you’ll find a role:
$role = RolePermission::find(2)->role;
User Roles
At this point we have users, roles, and permissions. But something is still missing – we forgot about user roles! Well, we didn’t really forget, just postponed adding them, but nonetheless we need to take care of them sooner or later.
User roles is a relation table to connect users and roles. I won’t waste your time getting into details though, so let’s get to the code.
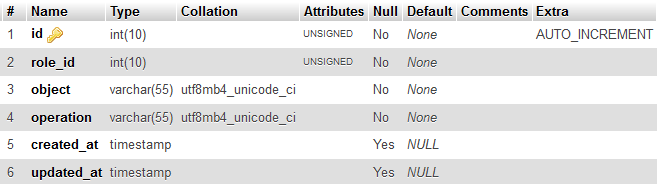
php artisan make:migration create_user_roles_table
public function up()
{
    Schema::create('user_roles', function (Blueprint $table) {
        $table->increments('id');
        $table->integer('user_id', false, true);
        $table->integer('role_id', false, true);
        $table->timestamps();
    });
}
php artisan migrate
Here’s our nice and shiny user_roles table:

Let’s create the model and define the relations:
php artisan make:model UserRole
class UserRole extends Model
{
    protected $table = 'user_roles';

    public function user()
    {
        return $this->belongsTo(User::class, 'user_id', 'id');
    }

    public function role()
    {
        return $this->belongsTo(Role::class, 'role_id', 'id');
    }
}
class User extends Authenticatable
{
    ...
    public function roles()
    {
        return $this->belongsToMany(Role::class, 'user_roles');
    }
}
class Role extends Model
{
    ...
    public function users()
    {
        return $this->belongsToMany(User::class, 'user_roles');
    }
}
Authorization
We completed all preparations, and it’s time to implement the cornerstone of our ACL component – we’ll check if a user is authorized to perform certain operation. We will add the isAuthorized() method into our User model:
class User extends Authenticatable
{
    // ...

    public function isAuthorized($object, $operation)
    {
        return Db::table('role_permissions')
            ->where('object', $object)
            ->where('operation', $operation)
            ->join('user_roles', 'user_roles.role_id', '=', 'role_permissions.role_id')
            ->where('user_roles.user_id', $this->id)
            ->exists();
    }
}
Checking if a user is allowed to do something is pretty simple:
Auth::user()->isAuthorized('post', 'create')
You can use this code anywhere you want: directly in a controller or a model, in a custom Gate or a Policy.
What’s next?
Obviously, our ACL component isn’t fully completed. It wouldn’t be possible to describe everything, but the basic idea should be more or less clear.
Here are some improvements you’ll probably need to consider:
Thanks for share, great article!
When is data stored in tables like role_permissions?
Hi Oliver.
Ideally, there would be an UI to manage the roles and assign permissions to them. At this point you can just add them manually into the database to make the component work.
Using eloquent, how would you view all role_permissions?
Great article, I am curious about how this setup performs at scale. Do you have any experience with that?
Thanks Erik!
It will work well to some degree, depending on how often user permissions need to be checked. At some point it will require caching though.
I don’t see it becoming a bottleneck as there usually are much more demanding components, but it might still be worth optimizing.
I have another question. Often times, users will be allowed to access let’s say a post, but only if that post belongs to them or to a category or something. This method does not seem to provide a solution for that, or am I missing something?
I see two ways to implement per-post permissions:
1. If it’s a one-off need, it’s easier to add post attributes and handle it directly in the post controller.
2. If this kind of permission attributes should be reusable, we could add the permission attributes DB table and store additional data in there. It would require object-specific logic (posts, categories, etc.), but will be reusable to some degree.