Today we’ll learn how to protect adminpanel and enhance authorization component of a Laravel application by adding user roles. We will assign each user with a role (e.g. superadmin, admin, member), create an Auth Gate, modify the User model, and utilize the Authenticate middleware to help them get along. Furthermore, we’ll build a skeleton of your future ACL system, which you can adjust and improve according to your needs.
Laravel provides us with a chance to save enormous amount of time on one condition – we should know how to use it. I’m pretty sure anybody who learned Laravel was not only impressed by how simple a complex task can be done, but also by complexity of seemingly simple tasks. The perfect example is authentication – you can create it with a single Artisan command and Laravel will take care of the rest. On the other hand, many beginners struggle with authorization and don’t know how to approach protecting the admin area. Obviously, it’s a trivial task if you have some PHP experience, but doing it the Laravel Way may be tricky.
Getting Started
First, let’s get our authentication up and running. If you already have it set up, you can skip that, otherwise you can simply run following Artisan commands:
php artisan make:auth
php artisan migrate
Laravel generates the authentication controllers and the User model when you create new application, while these commands set everything up so you could start using them. The commands add the HomeController, enable default auth routes, and run the migrations over the database. I’m not going to get into details on this as it’s perfectly detailed in the Laravel docs.
What’s more important is the functionality we don’t get out of the box and that is crucial for any more or less advanced web application – user roles. Luckily, thanks to Laravel, that’s quite trivial to implement ourselves.
User Roles
First, let’s create new migration to add the role field into the database. To do that, we will utilize Artisan:
php artisan make:migration add_user_roles
If you look at the migrations directory (database/migrations/), you’ll see the new migration file has appeared and waits for you to fill it up with the code! It already contains the migration class, so we need to find the method AddUserRoles::up() and ask it politely to create our field:
public function up()
{
    Schema::table('users', function (Blueprint $table) {
        $table->string('role')->default('member');
    });
}
As you see, we added a new field called role with a default value member. We use a string field, which translates into VARCHAR(255) NOT NULL DEFAULT 'member' if you use MySQL, but you are free to use any other field type, such as SET('member', 'admin', 'superadmin').
Now we need to run the migration so our new field would appear in the database:
php artisan migrate
It’s time to check our database:

— Vincent? Are we happy?
Not so fast, we still need to make our migration rollback when needed. Let’s teach it how to drop the column whenever somebody asks it to:
public function down()
{
    Schema::table('users', function (Blueprint $table) {
        $table->dropColumn('role');
    });
}
Hurray! Our users have roles now, let’s go try them on!
Authorization Gates
Laravel Auth Gates determine whether a user is allowed to perform the action and consist of a closure passed into the Gate facade.
We will create two gates:
- Gate
accessAdminpanelwill only allow for superadmins and admins to proceed - Gate
accessProfilewill protect the user account and only allow members to access it
We will place the gates into the AuthServiceProvider::boot() method.
Filename: app/providers/AuthServiceProvider.php
// importing the facade
use Illuminate\Support\Facades\Gate;
...
public function boot()
{
    $this->registerPolicies();

    // the gate checks if the user is an admin or a superadmin
    Gate::define('accessAdminpanel', function($user) {
        return $user->role(['superadmin', 'admin']);
    });

    // the gate checks if the user is a member
    Gate::define('accessProfile', function($user) {
        return $user->role('member');
    });
}
As you see, we added two gates that accept only one parameter – current user. The user is passed into the gate automatically, while the gate isn’t called at all and always returns false if the visitor is not logged in. You can also pass additional parameters into the gate, but we don’t need any at this point.
User Model
Have you noticed anything wrong in the code above? Good catch, the role() method does not exist in the App\User model, we need to create it!
/**
 * checks if the user belongs to a particular group
 * @param string|array $role
 * @return bool
 */
public function role($role) {
    $role = (array)$role;
    return in_array($this->role, $role);
}
This simple method checks if the user role belongs to the list of roles passed as the argument. The $role argument can be either an array, or a string, which will be converted to an array.
Middleware
Middleware, as you might have guessed from the name, is executed in the middle of the request, either before the controller action, or after.
We will utilize the Laravel middleware called Illuminate\Auth\Middleware\Authorize. It provides us with a simple way to call a Gate and check if it allows the user to access something.
Luckily, it’s already enabled, but let’s check that anyway. Open the file app/Http/Kernel.php and find the $routeMiddleware property, it should look like this:
protected $routeMiddleware = [
    'auth' => \Illuminate\Auth\Middleware\Authenticate::class,
    'auth.basic' => \Illuminate\Auth\Middleware\AuthenticateWithBasicAuth::class,
    'bindings' => \Illuminate\Routing\Middleware\SubstituteBindings::class,
    'can' => \Illuminate\Auth\Middleware\Authorize::class,
    'guest' => \App\Http\Middleware\RedirectIfAuthenticated::class,
    'throttle' => \Illuminate\Routing\Middleware\ThrottleRequests::class,
];
Yay, it’s there and responds to the name can. Let’s see it in action.
Protect a route
First, let’s create a controller to protect using following artisan command (ah, artisan again):
php artisan make:controller Adminpanel/DashboardIt create new Dashboard controller in the file app/Http/Controllers/Adminpanel/Dashboard.php
However, the controller is empty. We need to create the index action, please open the file and insert following simple method inside the controller:
class Dashboard extends Controller
{
    public function index() {
        return 'This is the dashboard';
    }
}
Now we need to create a route and protect it with the middleware. Open the file routes/web.php and add following code at the end of it:
Route::middleware('can:accessAdminpanel')->group(function() {
    Route::get('/adminpanel/dashboard', 'Adminpanel\Dashboard@index');
    // future adminpanel routes also should belong to the group
});
As you can see, we create a route group that will contain all adminpanel routes. It allows us to apply the middleware once, and it will automatically be applied to all routes the group contains.
Next time somebody opens the URL /adminpanel/dashboard, the router will call the middleware can and pass the parameter accessAdminpanel, which is in fact the name of our Gate.
Let’s Rock!
Finally, it’s time to see everything in action! Register or sign in and open the URL http://your-website.local/adminpanel/dashboard
You should see something like this:
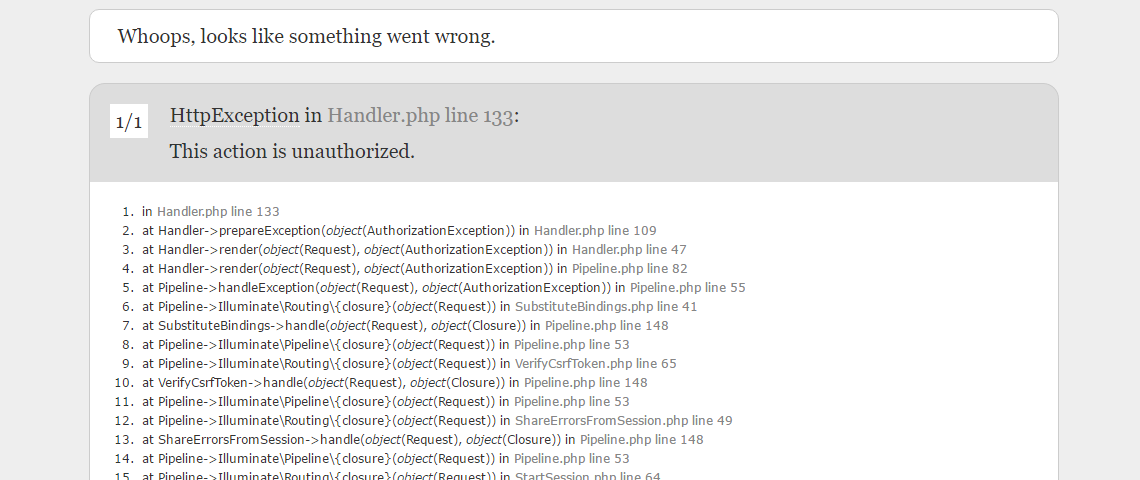
Don’t you worry, that’s exactly what we’ve expected! You are logged in as a regular user, you should not be able to access that route.
If you set APP_DEBUG parameter to false in your .env configuration file, the error message will be brief with no technical information, but it will still forbid the access, which is exactly what we need.
So, we see the Gate denying access to the route, but will it let the superadmin in? Please go ahead and change your role to “superadmin” using PHPMyAdmin or any other tool and open the page once again.
You will see “This is the dashboard”, which means that everything went great and your admin routes are safe and sound!
What’s next?
We completed the basic authorization implementation using Laravel internal features, while learning how to create auth gates and integrate it into your application.
However, the ACL cannot be complete without access permissions, and it might be a topic of one of the next articles. In the meanwhile, you could familiarize yourself with another approach to solving the same problem, explained in the article Laravel 5 – Simple Route Access Control by Joseph Ralph.
Also, you could familiarize yourself with Policies and how they can be utilized to improve the authorization, they are perfectly covered in the Laravel Docs.
A few interesting Laravel posts are coming soon, stay tuned!
Wonderful..!! thanks for such a nice security tip.
Thanks! When will you release article on ACL?
The Route implementation apparently needs some refinement for newer versions of Laravel. Here’s the version I had to use:
Route::middleware('can:accessAdminpanel'), function() {Route::get('/adminpanel/dashboard', 'Adminpanel\Dashboard@index');
// future adminpanel routes also should belong to the group
});
Jason, I adjusted the code as you suggested, thanks for the tip!
this route
Route::middleware('can:accessAdminpanel')->group(function() {

    Route::get('/adminpanel/dashboard', 'Adminpanel\Dashboard@index');

    // future adminpanel routes also should belong to the group

});
is enough to protecting controlles? How to check access level inside controllers?
Says 404
For Laravel 8 your route should look like this:
use App\Http\Controllers\Adminpanel\Dashboard;
Route::middleware(‘can:accessAdminpanel’)->group(function() {
Route::get(‘/adminpanel/dashboard’, [Dashboard::class, ‘index’]);
// future adminpanel routes also should belong to the group
});
When I access this, it say’s 403 Forbidden, how do we redirect it instead to a page?